HOW-TO, Techniques, & Best Practices Channel
| Advanced DVD Menu Creation Using Adobe Encore By Staff posted Aug 3, 2009, 13:53 |
Click here to get a copy of the September 2007 Edition, so you can read and enjoy all of the excellent articles inside. Check out this article in the September 2007 print edition of StudentFilmmakers magazine, page 48.
Step-by-Step How-To
by Jeff Bellune
Peer deeper into the text of this how-to and realize that one of its major implications is today�s filmmaker must have functionally-competent knowledge of several types of applications: Non-linear editing, audio processing, motion graphics, special effects, image manipulation and even basic 3D modeling. Often, knowledge of more than one application of any one type is required. Picture yourself, as the old saying goes, as a �jack of all trades, master of none�. Although as your experience grows, you will most certainly become a master of some.
I won�t go in-depth about basic program functions in the applications I use in this exercise. The assumption is that you already have enough general knowledge to make good things happen in an application, even if you haven�t worked extensively with a particular software title.
So where do we start? I always start with a pencil and paper. You may find it ironic that such a low-tech beginning would be required before finishing with a high-tech tool like Encore. But if you don�t begin that way, it is too easy to get lost and make silly mistakes in the project. A simple flowchart works well, but anything showing you how the audience is supposed to get from here to there and back again will make your authoring life a lot easier.
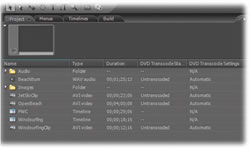
For the example project, we will focus on making complex video thumbnail buttons. Advanced DVD menu creation involves more than just fancy video thumbnail buttons, obviously. But I believe this facet of menu-making to be essential when it comes to separating the ordinary from the extraordinary. Let�s fast-forward to a point in the project where we have used our plan to execute the usual stuff � imported assets, created timelines, added chapter points, etc. That means it�s time to make the menus. Here is a screenshot of the example project just before making the Main Menu:
To begin creating the menu, we�ll add a background video with appropriate audio.
While you weren�t looking, I used a 3D program to create a 3D text object that we�ll add to the menu to dress it up a bit.
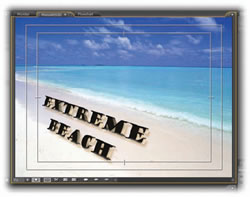
If we were to add plain vanilla, boring video thumbnail buttons, here is what the menu would look like:
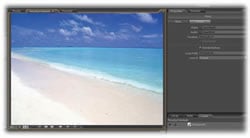
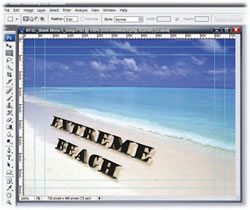
It�s okay, but the look of the buttons should be a little more interesting. We�ll use Photoshop to tackle the task. Let�s start with the 3D text version of the menu and bring that into Photoshop.
1. Open the Menu Viewer with the proper menu displayed, or select the proper menu in the Project panel and choose Edit>Edit Menu in Photoshop from the Encore menu bar.
2. Photoshop opens, and loads the menu from Encore. Note the name of the document in PS may not match the name of the menu in Encore�s Project panel. The displayed document name in PS reflects the internal name used by Encore to keep track of the project elements.
3. The guides that appear in the PS document represent the Title Safe and Action Safe areas.
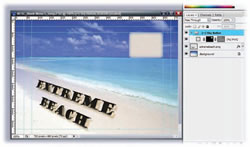
The first way we will modify the video thumbnail buttons is to feather the edges. Here�s how to do that in Photoshop:
1. Create a new Group. Name it with the proper button prefix: (+).
2. Create a new Layer in the Group. Name it with the proper video placeholder prefix: (%).
3. Use the shape tool set to �Shape Layers� (the first of the three icons) and draw a shape. This creates a shaped Vector Mask. We�ll use a rounded rectangle, but any shape will work.
4. Ctrl+Click the Vector Mask icon in the Layers palette to load the selection.
5. Right-click the selection with the Marquee tool and set the Feather to whatever you want. Try 7 or 8 pixels for this menu.
6. From the Layer menu, choose Layer Mask>Reveal Selection.
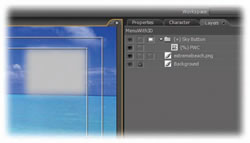
At this point, the menu and the Layers palette should look like this:
We don�t need the Vector Mask anymore; the Layer Mask is all that Encore needs.
1. Right-click the Vector Mask in the Layers palette and delete it. This leaves a feathered Layer Mask.
2. Save and close the document and return to Encore. The gray video placeholder button should be feathered very nicely. Notice how the Layers panel in Encore looks almost exactly like the Layers palette did in Photoshop.
Now we�ll add a gradient to the video placeholder to help it blend in to the background even more.
1. Select the menu in Encore and choose Edit Menu in Photoshop again.
2. Make sure the foreground color is black.
3. Select the Gradient tool.
4. Set the gradient in the gradient options bar to go from foreground to transparent.
5. Set the gradient type in the gradient options bar as desired. We�ll use a Reflected Gradient.
6. In the Layers palette, click on the Layer Mask icon to ensure the gradient will be applied to the mask only.
7. Drag the gradient tool across the Layer Mask in the document window. The result should be a transparent gradient on the Layer Mask.
8. Save and close the menu in Photoshop and return to Encore.
Back in Encore, here�s how the video placeholder button should look:

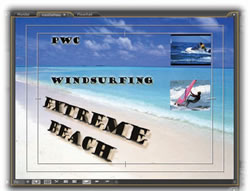
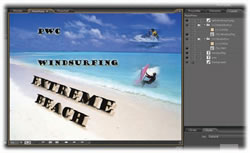
Repeat the Edit in Photoshop operation for as many buttons as are required. Our project will use just two. Back in Encore, link the buttons to the appropriate Timelines. Here�s what the final version of the Main Menu looks like:
For this project, I used Adobe After Effects to create a looping video menu background, Adobe Soundbooth to edit and clean up the background audio for the menu, Adobe Premiere Pro to create the content for the main movie, Ulead Cool3D Production Studio to create the 3D text, Adobe Photoshop to dress up the video buttons and Adobe Encore to author the DVD project. As you can see, creating DVD menus having more than just a basic appeal can require some fancy footwork through various applications. Honing your skills in only one or two specific applications just isn�t enough for the modern filmmaker anymore.
This article may not be reprinted in print or internet publications without express permission of StudentFilmmakers.com.
Jeff Bellune holds a degree in Mathematics and Computer Science from the University of California at Los Angeles. An experienced video editor, he is the owner of the video production and post-production company, Bellune Digital Video Services (www.bellunevideo.com), and author of The Focal Easy Guide to Adobe ® Encore ™ DVD 2.0.
| Don't miss another important edition of StudentFilmmakers magazine which focuses on cutting-edge, pre-production, production, post production, and distribution technologies and techniques. 1-year, 2-year, and 3-year subscriptions available with discounts from the cover price. Back Issues are also available while copies last. Go to www.studentfilmmakers.com/store >> |
StudentFilmmakers magazine, the #1 Educational Resource for Film and Video Makers, publishes 12 editions per year. Subscribe today and get this important magazine delivered right to your doorstep every month. Each edition contains high level, educational articles for serious filmmakers and videographers like you - articles including cutting edge, real-world practices, trends, and technology, as well as in-depth inspiring interviews with independent filmmakers and experts.
There is something for everyone in each issue, whether you are a director, cinematographer, camera operator, gaffer, editor, producer, sound engineer, animator, composer, actor, screenwriter, ... With today's technology changes coming faster and faster, we are all students.
StudentFilmmakers magazine would like to hear from you!
Click here to share your comments and feedback about the magazine, monthly editions, your favorite articles, and your favorite topics.
We always welcome and appreciate your Reader Comments. View them here, and send yours to the editors today!