Amplify Your Practical Sources to Get the Light You Need
by Saro Varjabedian
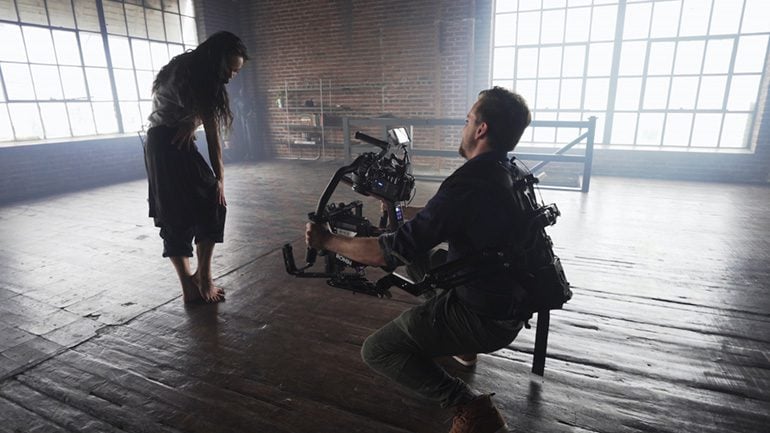
It has been my experience that in the world of independent filmmaking the cinematography is locked in a constant struggle between wanting to light a scene to an ideal vision and having to light based on a budget. However, vision does not need to be compromised when faced with limited resources. It just means that a little more ingenuity needs to be added to the project. One technique I have used to get around the lack of time and/or funds is to turn to my practical light sources to get the look I want.
Practical light sources refer to the physical motivators for light in a scene such as lamps, chandeliers, windows/sunlight, televisions, fire and ceiling fixtures. Often, practicals in interior scenes are looked upon as part of the set design rather than as a light source, the reasons being that traditional sources like household lamps and fixtures do not offer enough light to properly capture an image on film or video. Beyond that, film or video’s ability to simultaneously produce detail in both the shadow and highlight areas of an image is far less than what human eyes can produce. If you were to go into any house at night and use the practical lights (ceiling or lamp lights) to record an image, than you may capture something, but it won’t be what your eyes see. You will probably need to be at the lowest f-stop with the lowest possible shutter, and you may still need to increase the gain, or use the fastest film possible. The contrast may be so high that whole areas in a room will be dark or underexposed losing the detail of the room, while the parts of the room closest to the light source may be overexposed losing detail once again. You may even get an image, but it will probably be too flat to be worth using. By amplifying the light output of your practical sources you can get the light you need to create a great image and for cheap.
When lighting an interior scene, I always start off by observing the natural lighting derived by the practicals of the location. Often times the natural lighting setup of the room creates tones and shadows which would work perfectly for the scene if they could be translated on to the tape or celluloid. I found myself in such a predicament on a recent project I worked on.
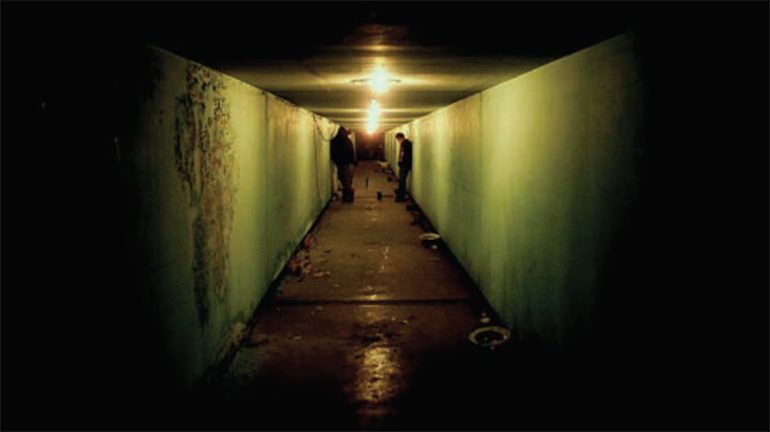
The scene takes place in a psycho ward. The protagonist is led threw a hospital by a doctor. As the protagonist delves deeper into the hospital, towards the antagonist of the film, the setting needs to change to reflect the sinister nature of the antagonist.
During the pre-production phase we found an abandoned psycho ward with a long underground tunnel-like corridor, which connected two buildings. As soon as I saw it I knew that the natural light layout of this location was exactly what I wanted for the scene. But I also knew that lighting it would be extremely difficult and building a replica of it was beyond our budgetary means. First, the ceiling height of the tunnel must have been less than 7 feet, and I knew I wanted the light to come from overhead. Second, there was no electricity (this was an abandoned building). And third, we were really scraping at the bottom of the barrel for both time and money.
First, I envisioned how this corridor would look in reality. This inspired me to find a way to get the light I needed out of the practical sources of the location. The ceiling of this corridor had inlets with light fixtures inside. These inlets were spaced about ten feet from each other as they stretched down the corridor. The wiring for these light fixtures was totally rusted and probably unusable. Plus, the wiring was hidden behind concrete. There was no way for me to just find the circuit and attach the generator to the line. So I decided to gut out the inlets, put in my own Home Depot improvised lighting fixtures and run 14 gauge lines from fixture to fixture up into a generator. The most important result of changing out the fixtures was that it allowed me to boost the wattage of each practical light source. This is what I mean by amplifying your practicals. Under normal conditions if the lighting system were intact for this location they would have been using 15- watt florescent bulbs. I used 200-watt incandescent bulbs purchased at Home Depot. I had ten of those improvised practicals going down the corridor almost giving me the light I needed. But I still needed to add a little more fill to the faces of the characters to get the right exposure on their faces.
The shot required me to track the characters down the corridor. To get extra light I put a 600-watt open face light with a 250- diffusion gel on the dolly with the camera. The light moved with the camera as we tracked the characters down the hall giving a nice soft fill so I could get the right exposure. The only problem was that a constant fill would not look right because it would not be motivated by the practicals. The distance from the practical light sources would create natural shadows and highlights on the characters’ faces as they moved from light source to light source. For instance, when the characters were directly in front of the light, their faces should have been a bit overexposed. As they walk past the light and the practical light is behind them, their faces should become underexposed. By introducing this other light source not motivated by the practicals, it could have eliminated that natural play of light and darkness I wanted to get from the practicals. I hooked up a dimmer to the 600 open face and dimmed the light when the characters had the light source behind them and increased it when the light source was in front of them.
To put the nail in the coffin I also attached a dimmer between the generator and the power line to the practicals. By shutting the dimmer on and off rapidly we created a bit of a flicker effect as well. The dimmers were household light dimmers that were purchased at Home Depot.
As far as the technical specs of the shoot go I was shooting on the Sony F900 with a Mini Pro 35 and Zeiss lenses. I primarily used a 12 mm lens giving me greater depth and elongation of the tunnel. The light output from the practicals allowed me to shoot at an F- stop of 4 with a shutter speed of 60 while keeping the gain at 0.
In total, not including camera, lenses and dolly rental, the cost of setting up the lighting for the shot probably ran a little over $500. This included a generator which we purchased for $260, the 10 bulbs which ran about $30, the 14 gauge lines which were about $60, the diffusion material and frame holder for it, about $50, 2 dimmers for $70, extension cords, duct tape, electrical tape, banana clips and wire cutter for roughly $100.
The result: look to amplify your practical sources and have a really fun shoot and an awesome image.
![]()
 Saro Varjabedian, a Queen’s native of Armenian descent is an award winning international cinematographer. As a cinematographer, Saro has photographed eight feature films, one feature documentary, several web-series and countless shorts. He has filmed in Cuba, Armenia, France, Lebanon, Mexico and India. His work on the short film “Jesus Loves Yusef” has won Saro the Best Student Cinematography Award at the 2012 Palm Springs International Film Festival. His work on the International Lebanese/French Co-Production feature film entitled, “The Traveler” garnered Saro a nomination for Best Cinematography at the 2018 Lebanese Movie awards. His most recent works include photography on the American/Cuban production of “Havana Darkness” and the international action picture “Welcome to Acapulco.” Saro recently wrapped principal photography on the Indie feature entitled “The Scrapper.” Saro is a Columbia MFA Graduate and has taught cinematography at New York Film Academy. (sarovdop.com)