by Kevin Zanit
As a cinematographer, one of many skills you should have is the ability to “cheat” what time of day you are shooting for another. A situation I encounter regularly is shooting at night in a room filled with windows when the scene is supposed to take place during the day.
There are many reasons why this situation arises. Some of the more typical reasons: time constraints of shooting in a particular location require that work to be done at night; work on a scene continues into nighttime; or sometimes we may be after the increased control of the look that shooting night for day sometimes offers.
Night for day is a very useful tool; however, there are several compromises to take into consideration to accommodate this type of shooting. Generally, you must be content with having “blown out” windows, (windows that will appear mostly white, with no detail outside of them). This is why it is very important to work with the art department on incorporating some sort of window coverings. I have found very translucent white or off-white curtains work very nicely. I find blown out curtains look more appealing than a blown out perfect square window, but every situation is different.
It is possible to show detail outside the windows, but it is very difficult to successfully light a large outside area while also sending light in through the windows. However, if your shot only shows a very small amount of area outside the window, it is possible to light that area as well.
Typically the location needs to be on the first floor, or if on a higher level, must have some kind of built-in platform that could support lighting units. If it does not have a platform that could support the lights at a reasonable distance from the window, then you would need a Condor type lift to hold lights at or above window level.
If you can contend with these compromises, you will also find there are several advantages to shooting night for day. You can maintain complete and total control over how the light comes into a room without the need to “tent” the windows to block out the sun and then relight to your preferences. It is easier to achieve perfect continuity throughout the night of shooting because there is no sun moving throughout the day. And it is simpler to create a variety of daytime “looks” for different parts of your story.
The general principal behind shooting night for day with a scene that shows the windows is to create the illusion of sunlight by having either the windows glowing brightly in frame as if the sun was shining outside, and/or to incorporate shafts of “sunlight” streaking through the room. When a window is in the shot, you have two choices about how you want that window to look and what it should do. It can provide actual illumination of the actors and the room, or it can “glow” softly without affecting the overall light level in the room very much.
There are infinite ways to make a window “blown out” or just glowing nearly white. A few of the common methods are listed here, but always remember to experiment with your own ideas to find what works best for you.
Place “1000H” tracing paper on the outside of the window, cut to size, and then place a large lighting unit a distance from the window. This creates a very pleasing soft light through the window that can provide illumination in the room, or by adjusting the brightness of the lighting unit, can provide a glowing window that does not affect the light levels much. You could also substitute 1000H paper with any diffusion of your preference, but if the diffusion is too light, the light source behind the window can sometimes show.
To create a more subtle “glow”, one can place white bounce boards a distance from the window and bounce a light source into these boards. You can also use a combination of both methods – using diffusion on the windows with bounce boards. Generally speaking, the diffusion helps to “smooth” over the light on the windows to insure a somewhat uniform glow without any “black holes” through the white.
To create a harder “sunlight” through the windows you need to use much less diffusion (if any) on the windows. The problem is that a window is fairly clear, and thus will not tend to completely blow out, allowing you to see black outside of the window, or even the light source itself. A trick I have used is to lightly spray the outside of the window with dulling spray. This very subtle bit of material (essentially diffusion) on the window will pick up the light and help blow the window out without softening the light too much. It also helps to use a bigger light source because the larger lens of, for example, a 20k Fresnel is essentially a bigger source that maintains its intensity towards the edges of the beam, thus covering the window more evenly. You will need to overexpose the windows more when going for a bare window “hard light” look. Do this with either a bigger unit, or by lowering all your other units’ intensities, so you can open up on the lens, thus causing the window to be more overexposed.
Sometimes a combination of hard and soft light through the window is needed. An example of this would be, if you want some general soft light with some dappled hard “sunlight” to punch things up. There are several ways I have achieved this look. You don’t always need to have your diffusion flush with the window. You can take a large frame of diffusion (8’x8’ for example), and place it several feet from the window, and then between the gap, work in your hard light. The only drawback to this is you tend to need a much larger unit to fill the entire frame evenly. Another method I have used is to put my 1000H on the window, and then cut a small square or two of it out. Through the holes, I can send some very directional hard light in to punch things up a bit.
Using the fundamentals discussed above, we can go through a situation I was faced with when shooting a project with extensive night for day work.
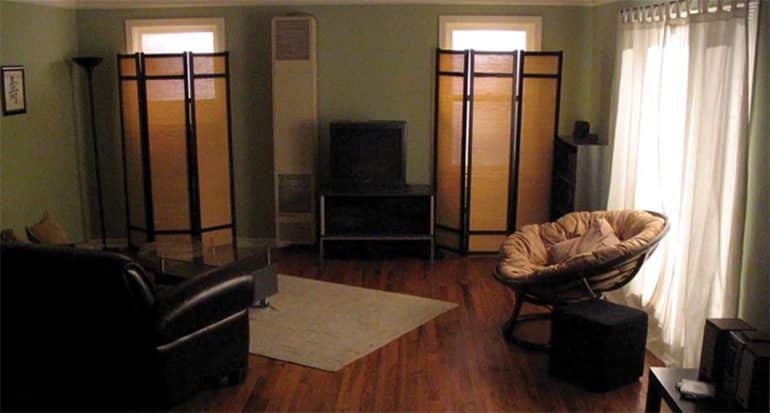
The above still shows the room after it was lit at around 1:00 a.m.
First, examine the largest window on the right. I had the art department utilize a translucent curtain to cover this large window. Most of the general ambiance in the room comes from this window. Outside of the window was a “Big Eye” 10k up high on its stand and centered at a distance that completely covered the window with light.
The 10k mainly provided a nice general room level, but the scene had actors seated on the chair and couch. To bring up their levels, and to shape the light on their faces, I used some narrow spot PAR cans also through that large right window for more directional light. In many situations, you can light the actors from the general direction of an on screen window without having to actually light from the window, but in this case, there was nowhere to hide any lights inside the set, so all light had to come from the on screen windows.
Next, we have the two smaller windows on the left and right. For these windows I used the technique of placing several white bounce boards, and shining a light (in this case, a 1.2k PAR) into those bounce boards outside of each window. To smooth out the look, I placed some very light diffusion on the windows.
I then used a small light bounced into the ceiling to provide a bit more general ambiance in the room. You will often find yourself needing to bring up the ambient levels in a room more when shooting night for day because during the daytime sunlight bounces off of everything which contributes to filling things in a bit more (which can be an advantage or disadvantage depending on what you are going for).
Again, there are many ways to create a night for day effect. These above techniques are good fundamentals to practice and see what works best for you by testing and observation of the real world around you. There are no rules in lighting, just simple fundamentals to expand upon. When trying to faithfully recreate a daylight look, I take my cues from how the room looks in actual daylight, and then modify that look to suit my needs.
![]()
In addition to filming music videos, Kevin Zanit has served as cinematographer on narrative films, Room Service (2006), These Days (2006), Inner Prison (2005), and Passing Moments (2003).