Creating Prosthetic Appliances with Gelatin: Recipe for a Foaming Gelatin by Todd Debreceni. Pages 44, 48, 50.
The gelatin in Jell-O is what enables you to create all sorts of different shapes. I’m sure you’ve all heard of it, but what exactly is it? Well, gelatin is a structural protein called collagen found in many animals, including humans. In fact, collagen makes up nearly one-third of all protein in the human body. Collagen is a large molecule that is used by our bodies to make skin, bones and tendons both strong and flexible – that is, somewhat elastic.
To manufacture gelatin, manufacturers grind up bones, hooves and connective tissues of cows, pigs and sometimes horses, and treat these parts with either a strong acid or base to break down the cellular structure of the tissue to release the collagen and other proteins. After this treatment, the resulting mixture is boiled. During this process the collagen protein is broken down, resulting in the creation of gelatin.
Because of its versatility, gelatin is a common ingredient in many foods, and can be used in many ways. Gelatin is used in foods from chewing gum to yogurt. It is even used to make capsules for medications and vitamins to make them easier to swallow.
By now you’re probably wondering, What the heck does this have to do with special make-up effects? Well, in addition to gelatin being used as an ingredient in foods and cosmetics, it is also one of the primary materials used for creating prosthetic appliances, along with foam latex and silicone. Ahhhhhh….
There are a number of formulas for making your own gelatin that you can find on the Internet, as well as purchasing pre-made gelatin prosthetic material from various industry suppliers. When describing gelatin, manufacturers refer to bloom. The bloom factor or bloom strength of gelatin is an industrial standard which measures the relative firmness of the gelatin in a cured state. Gelatin used for makeup effects work usually has a bloom factor of 300, whereas gelatin you can purchase from your local grocer will have a bloom somewhere between 200 and 250. This may be just fine for work you will be doing, but just be aware that the tear strength will not be as high as when using a gelatin with a bloom of 300.
Gelatin is considered to be hypoallergenic, that is, allergy-free for use on most people. That is a good thing. Gelatin is also considered hygroscopic, which means it has a tendency to absorb moisture from the atmosphere. This is both good, and not so good. Good, in that it allows gelatin to be soluble – to liquefy and dissolve. With the addition of water, the gelatin particles swell and expand, actually absorbing up to 10 times their weight in water (which, in turn, can make gelatin appliances somewhat heavy). Not so good, in that gelatin appliances can swell in proportion to humidity changes in the air, and shrink over time through evaporation.
One way to help minimize this change due to humidity is to substitute glycerin for almost all of the water used in the gelatin appliance formula. This is very good for creating a variety of wounds and injuries – cuts, burns, bullet holes, swelling, etc. This gelatin can be colored with flocking material, food coloring or powdered cake makeup and stored in small squeeze bottles to be heated until the gelatin liquefies. This is similar to a number of gelatin effects kits that are available commercially. Just be very careful not to overheat the gelatin. Because it is organic material, it can be severely damaged or ruined if heated too much (or too often). And, you don’t want to burn your actor by applying gelatin that is too warm. Always test the temperature before application!
Glycerin is also hygroscopic, so some formulas replace some of the glycerin with Sorbitol, which is derived from corn syrup and is less affected by changes in humidity than glycerin. Sorbitol also increased the structural integrity of gelatin formulas, making more tear-resistant which is critical for prosthetic work. (I’ve seen formulas that added white glue for the same purpose with good success.)
Zinc Oxide can also be used in small amounts to add strength and greater tolerance to temperature changes (remember, gelatin tends to melt when heat is applied…). You will have to experiment when using zinc oxide because it will affect the translucency of your finished gelatin appliance. Zinc oxide powder is the preferred form, but it can be tough to find. Zinc oxide ointment will work, though. Regardless of what formula you wind up using and calling your own, keep your finished appliances in air-tight plastic bags, away from the light and in a cool place. They will last much longer.
For prosthetic appliance work, the gelatin you use will need to be light and soft – foamy. So, the recipe I’m going to give you is for a foaming gelatin. The resulting gelatin will not be as light and soft as foam latex, but it will be substantially lighter and spongier than a solid gelatin appliance, and definitely lighter than silicone gel.
Here is a basic gelatin formula. You will notice this recipe does not have Sorbitol, white glue or zinc oxide. Do some experimenting. Makeup effects artists must be part mad chemist.
Note: You can double, triple… quadruple this formula. Very small batches aren’t as easy to mix as a medium batch, which this describes. But, once you’ve mixed a medium batch, you can take small amounts and use them in small molds.
Ingredients:
160 grams (1/4 cup) Glycerin
40 grams (1/8 cup) Gelatin
1 gram (1 tsp) Quick rise yeast
3.5 grams (3.5 tsp) Water
Pigment color of your choice. (You can also use colored flocking, food coloring, or powdered cake makeup.)
In a microwave-safe bowl, pour the glycerin. Slowly add the gelatin granules to the glycerin. If you are adding a pigment, mix the pigment into a small amount of glycerin before adding it to the batch. Heat the glycerin and gelatin in the microwave for a minute or two – in 5-10 second increments – being careful to PREVENT BRINGING TO A BOIL. If the gelatin boils, the collagen in the gelatin will be destroyed and you will need to start over. Gelatin melts at about 70 degrees C, or close to 160 degrees F, depending on altitude. When it is completely liquefied, pour the gelatin into a plastic quart cup.
Let the gelatin cool completely. (You can put it in the freezer or refrigerator – you’re essentially making Jell-O.) Then re-melt the gelatin in the microwave 3 or 4 times to ensure that all of the water has evaporated from the glycerin.
Before going on to the next step, apply a very thin layer of either petroleum jelly or vegetable oil onto both the positive and negative of your mold as a release agent so the gelatin will not stick to the mold surface when you de-mold your appliance.
When you’re ready to cast your appliance, mix the yeast with the water and let this mixture sit for at least two minutes; then, melt the gelatin, being careful not to let it boil, then add the yeast and water mixture, stirring it into the melted gelatin. It will immediately begin to foam. Stop stirring and let the gelatin mixture rise until it stops, then stir well with a large craft stick to refine the gelatin – that is, to remove large air bubbles and to make the foam mixture consistent. It should be the consistency of meringue. If the gelatin cools too much, reheat it briefly so it is pourable. Like foam latex, foamed gelatin can be poured or injected into a mold.
It is a good idea to heat the negative half of your mold in a warm oven until it is warm to the touch. This is an optional step, but may provide a better appliance surface. The positive can be either heated or chilled prior to foaming your gelatin. If chilled, it should be cold to the touch but not frozen. The goal is to speed up the gelling time. Pouring warm foam into a frozen mold could crack it. Experimentation will dictate what is best.
When your foam is ready to pour, fill your mold; use a spatula or large craft stick to work the gelatin into the warm negative mold and close it immediately. Be careful not to trap air bubbles when closing the mold. Clamp or press the mold halves together tightly to ensure a thin blending edge of the appliance, then place the closed mold into a freezer or refrigerator to gel. Depending on the size of your mold and the temperature, it may take anywhere from 30 minutes to an hour before the appliance is ready to be de-molded.
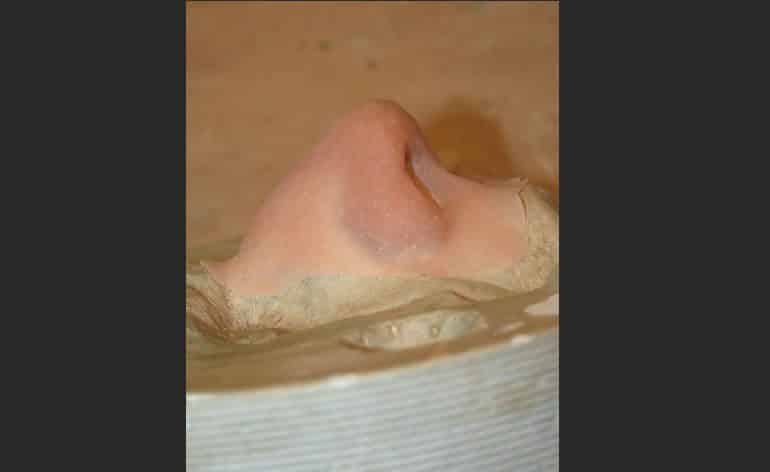
You can tell when the foamed gelatin has set by touching the overflow; if it bounces back, it’s ready to de-mold. Carefully open the mold halves and powder the gelatin to prevent it from sticking to itself. Place it back on the positive and it is ready for application or painting.
Photos by Todd Debreceni.
Todd Debreceni began his career in entertainment with PBS while in graduate school at the University of Tennessee, and has worked at TBS in Atlanta, and 20th Century-Fox Television, Warner Bros., and Walt Disney Pictures in California. Todd has created makeup effects for many theatre productions, and is a recipient of a 2006 Denver Post Ovation Award for makeup. In addition to working in his Aurora studio, Todd conducts workshops, teaches at several Denver-area schools, and is currently writing a new book on special makeup effects.
To discuss these techniques and more sign up for the Forums at studentfilmmakers.com/forums