HOW-TO, Techniques, & Best Practices Channel
| Feature Film Lighting in Three Points By George Avgerakis posted May 19, 2008, 09:18 |
Click here to get a copy of the January 2007 Edition, so you can read and enjoy all of the excellent articles inside. Check out this article in the January 2007 print edition of StudentFilmmakers magazine, page 10.
George Avgerakis is VP Creative Director of Avekta Productions in Yonkers, New York, an e-media production company that produces video, CD-DVD, web content and print in English and all foreign languages.
 There are many new lighting products now on the market, ranging from fluorescents, which came out a few years ago, HMIs before that, and now LED location lights.
Regardless of the technology behind making the light, the same techniques for using the light persist from today, back to the days of Edison. All techniques for using light are based on creating a predictable effect on film or video that illuminates and models the objects being photographed.
Cinematographers refer to the creative side of their work as “painting with light,” and the term is accurate, because the end result (so far) is a 2D screen. However, unlike the flat surface of a painting, lighting requires attention to 3D space because that is where our actors, props and sets live.
Most lighting in 3D space requires at least three lighting instruments. You can use fewer to get special effects, like silhouettes, and certainly more to cover complex scenes, but three lights per significant object is the rule. This is commonly referred to as “Three-Point Lighting.”
The three instruments can be almost any kind of light – even natural light, from the sun or a window, but as you will soon see, the three lights must have a controllable ratio of brightness. The need for control may sometimes rule out a certain source, either because it is too bright in relation to the other lights, or too dim.
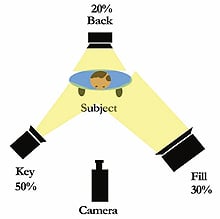
The three instruments are named according to their task and position in the scene. The positions are based on an imaginary circle, drawn on the floor around the object to be lighted. In addition to the three lights, the camera’s position is considered first, so let’s call that position on the circle, north.
The brightest light on the set is called the Key Light, and is placed either to the right or the left of the camera at about the northeast or northwest point on the circle. The Key Light is usually a focusing spot light that features a means of adjusting the “cone” of light from the instrument from a wide to a tight, spotted setting. A Lowell 1,000 watt DP-Light is a good example of a useful Key Light for location or set work, where one or two actors are going to be illuminated.
The purpose of the Key Light is to model the most important side of the object. Used alone, the key would create a highly dramatic effect, where one side of the object (or actor) would be brightly lit, and the other side left in darkness. Such effects are often intentionally produced to add a sense of danger or suspense.
The second brightest light is called the Fill Light. The fill light is placed on the opposite side of the camera from the Key Light at either the northeast or northwest point on the circle. This light is usually a soft light source. Soft light sources may not be controllable except by the size of bulb(s), or by a “variac,” a device that varies the electric voltage supplied to the instrument. A Chimera Softbox, fitted with a 500 watt Mogul base lamp, would be a suitable compliment to the Lowell Key Light above.
The purpose of the Fill Light is to flatten the scene’s dramatic qualities, fill in the opposite side of the actor’s face, and generally, to beautify the object. Sometimes fill lights are used alone to create a flat, TV style lighting, or to enhance the “reality” of a scene, by imitating the kind of ambient light that permeates most natural locations.
The third brightest light in the troika is the Back Light. This light goes at the south point on the circle, pointing directly at the camera, but so not as to shine in the lens, is positioned high and pointed steeply down at the back of the object. A Lowell 750 watt Tota-Light makes a good back light, although the attached barn doors must be carefully adjusted to keep this bright light from spilling anywhere but on the back of the object(s).
The purpose of the Back Light is to provide a bright highlight to the outline of the object, such as the shoulders of an actor, thus separating the object from the background. Without a back light, the object tends to fade backwards into the set, losing its individualism.
Using only a back light creates a stark silhouette which is not very useful except in the classic “anonymous” interviews one often sees on crime dramas, where the unapprehended felon is confessing evil deeds to the camera.
Once all three instruments are in place, it is important to assign them a specific ratio of light to each other. While this ratio may be adjusted to create various effects and moods, the starting point, when beginning to light the scene is to assign the Key Light to 50% of the light that will fall on the object, the Fill Light to 30% and the Back Light to 20%.
The amount of light of the Key and Fill can be measured with a simple photographic light meter by placing the light meter close to or in place of the object and pointing the light meter at the camera. This kind of light measurement is called incidence light reading because the meter is reading the light that is falling on the object to be photographed. Some light meters allow the user to point the light meter at the object itself. This is called reflectance metering. Do not use reflectance metering to determine the percentages of light in this process.
Begin with the Key Light by placing it and shining it on your object or actor. Adjust the light’s position, barn doors, and focus knob or variac. Add scrims and/or filters as desired. Then measure the light level and write the number down.
Next, add the Fill Light and adjust its intensity based on the light meter’s reading to provide a little more than half the intensity of the Key. This can be done with the variac, scrims, filters or simply moving the light closer or further from the object. Obviously, you will need to extinguish the Key Light while measuring the intensity of the Fill.
Once the Key and Fill are balanced, the Back light is added. Be careful to light only the back and top edges of the object. Kill the Key and Fill lights and measure the Back light’s intensity by pointing the incident light meter to the ceiling. This will give you an approximately correct measurement. The best measurement for a Back Light is to turn on all the lights and then to flip the Back Light on and off. If the effect is too bright on the edges, add a scrim, use a smaller bulb or reduce the voltage of the Back Light.
Once you think your three lights are balanced, it is important to ascertain if the objects themselves are suited to the light. I once tried to light a bowl of ice cream with the lights described above. This was not a good thing. We eventually used fluorescent lights, which of course are cooler. It is difficult getting a good effect with a fluorescent Back Light, so that one stayed incandescent – and hot – so we had to work fast.
Another issue is how bright the lights are for actors and non-actors. Actors are paid well to do their jobs without squinting or complaining. Non-actors, however, particularly physicians, CEOs and children, can cause a cinematographer to go to great lengths. Common methods of relieving the discomfort caused by lights are to use cooler lights, soft lights with voltage controls, reflectors and tents. Tents are composed of fabric or translucent plastic and suspended above the set. All the other lights are placed as before, above the tent, and the tent merely softens the result to a comfortable level.
Employing natural lighting, the wise cinematographer will first choose the brightest natural source first as the Key Light, since this will usually not be adjustable. Often it is the sun. When using the sun, for instance, the Fill Light can be a reflector – usually composed of a flexible metal fabric, stretched over a circular wire frame that is easily collapsed. Pocket mirrors, sides of white buildings and standing water can also be used by the clever lighting designer to provide sources of natural reflected light.
Now that you have the basics of three-point lighting, you are encouraged to experiment and gather skill in adapting these basic rules to ever more complex situations. Keep a notebook of each of your lighting plots, the instruments used, and, if possible, a photograph of the result.
This article may not be reprinted in print or internet publications without express permission of StudentFilmmakers.com.
| Don't miss another important edition of StudentFilmmakers magazine which focuses on cutting-edge, pre-production, production, post production, and distribution technologies and techniques. Six-month, 1-year, 2-year, and 3-year subscriptions available with discounts from the cover price. Back Issues are also available while copies last. Go to www.studentfilmmakers.com/store >> |
StudentFilmmakers magazine, the #1 Educational Resource for Film and Video Makers, publishes 12 editions per year. Subscribe today and get this important magazine delivered right to your doorstep every month. Each edition contains high level, educational articles for serious filmmakers and videographers like you - articles including cutting edge, real-world practices, trends, and technology, as well as in-depth inspiring interviews with independent filmmakers and experts.
There is something for everyone in each issue, whether you are a director, cinematographer, camera operator, gaffer, editor, producer, sound engineer, animator, composer, actor, screenwriter, ... With today's technology changes coming faster and faster, we are all students.
StudentFilmmakers magazine would like to hear from you!
Click here to share your comments and feedback about the magazine, monthly editions, your favorite articles, and your favorite topics.
We always welcome and appreciate your Reader Comments. View them here, and send yours to the editors today!