HOW-TO, Techniques, & Best Practices Channel
| Finesse in the Field: Techniques for Deriving the Most Punch from Your Jib Moves By Staff posted Dec 1, 2009, 09:40 |
Check out this article in the print edition of StudentFilmmakers Magazine, August 2008. Click here to get a copy and to subscribe >>
 Finesse
in the Field
Finesse
in the Field
Techniques for Deriving the Most Punch from Your Jib Moves
by Carl Filoreto
Monotony. Drudgery. Repetition. Your production schedule calls for b-roll of,
yes, yet one more building exterior or maybe [yawn] another drab office scene.
Or, perhaps you�re faced with the task of trying to breathe some life into a
mundane interview.
Well, don�t despair, there are creative techniques at your disposal that can
dispel the ordinary and inject visual interest into routine shots. One of my
favorite field production tools is a simple jib arm. Now, I�m not talking about
a fully deployed Jimmy jib with a thirty-foot reach, a full-size monitor attached,
which has motorized pan and tilt capabilities and requires a case full of weights
to counterbalance the entire proposition. No, I�m referring to a simple jib
arm that�s usually made of some type of collapsible center support that extends
to a maximum length of ten feet, can be set up in a short amount of time, and
can be packed into something no larger than a light stand case.
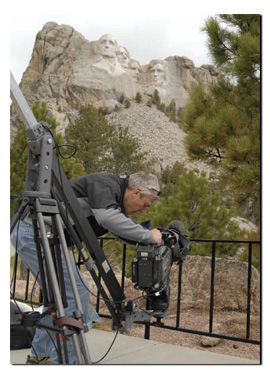 (Pictured)
The author operates the jib arm from the front of the camera, shooting for Good
Morning America�s National Treasures series. While the shoot is at Mt. Rushmore,
the national treasure highlighted was Badlands National Park, located in south
central South Dakota.
(Pictured)
The author operates the jib arm from the front of the camera, shooting for Good
Morning America�s National Treasures series. While the shoot is at Mt. Rushmore,
the national treasure highlighted was Badlands National Park, located in south
central South Dakota.
The jib arm I use regularly can be set up and fully functional in about ten
minutes. It�s simple, relatively lightweight, and extremely effective. A jib
arm allows you to put the camera in motion, and with a little planning you can
create dynamic visually compelling shots, where none previously existed. In
the process, it adds a significant level of polish and sophistication to your
production.
Sure, I�d be ecstatic to roll out a camera crane or full-size jib on every production,
but we live in an age of downsized budgets and crammed shoot days. A jib arm
is an effective tool since it�s relatively compact, it sets up quickly, and
it doesn�t have an adrenaline inducing price point. If you�re renting, you can
get one for somewhere in the neighborhood of $100 to $200 a day, depending on
the configuration. If you think you�d like to permanently add one to your production
tool collection, then they can be purchased for prices ranging from $1 to $5,000.
There are some guidelines to deriving the most punch from your jib moves. When
you put the camera into motion in space (I love that term, reminds me of NFL
announcers talking about players moving �in space�), you need visual reference
points to make the moves work. A huge jib move set in an empty desolate field
will be a yawner. A jib move requires a change in perspective. The foreground
is often the key, and a little planning will create success. Let�s say you�re
getting shots of a house where a key scene in your story takes place. You want
to look for a tree with low hanging branches, or a fence, or a stone wall�something
you can place in the foreground of the shot. When you start the jib move, that
object will provide a sense of motion and a changing perspective. You can start
low on the wall, glide along it and then move over it � creating a dynamic feel.
If you can combine the move with a push zoom, then wow, you�ve moved your production
values up a notch.
(Pictured) The author operates the jib arm from the front of the camera,
shooting for Good Morning America�s National Treasures series. While the shoot
is at Mt. Rushmore, the national treasure highlighted was Badlands National
Park, located in south central South Dakota.
If you don�t have any wonderful scene setters to work with, then think about
using the jib arm to create a unique perspective. I was recently shooting a
story for the CBS Evening News about a massive dental clinic that was set up
for several days to treat indigent patients. There were rows and rows of dental
chairs filing a large portion of a cavernous warehouse type building. I had
some time, so we broke out the jib arm, and I tried some moves starting low
at the foot of a chair, climbing over it as I moved the camera higher, and then
ending with a wide shot of the entire room. Not bad. However, when I tilted
the camera straight down, and raised the jib all the way up, I had a unique
perspective where I could fly the camera straight over several chairs, showing
all the neat rows of dental tools and accessories at each station. This was
very cool, and different.
A move with a jib arm can inject drama and purpose into scenes with on camera
talent speaking directly to the camera. If you start relatively tight on your
talent, you will be able to choreograph a move which will reveal a hopefully
meaningful scene setter. One note here, using the same principle as you did
with the b-roll foreground, place the jib arm so that the camera is fairly close
to the talent. That person, in a sense, becomes the foreground object, and the
sense of perspective changes around them. If you place the camera too far away,
it diminishes the impact of the move.
I�ve also used a jib arm many times to instill a different feel into an interview
situation. For me, the moves are relatively subtle, moving the jib arm just
enough to give the camera a feeling of floating in space, yep, there�s that
�moving in space� concept again. A busy background is helpful as it enhances
the sense of motion created by the jib arm.
As I talk about executing these moves, I should mention that there are a lot
of limitations to a jib arm, and sometimes you need to be fairly creative to
pull off the shot. As a rule, inexpensive jib arms don�t have any way to remotely
pan or tilt the camera. Usually, the tripod head mounts in a bowl at the end
of the arm, and well, that�s it. You can control the jib from the back or end
of the arm, but remember, you have no pan or tilt control. I regularly use a
zoom control in my work, so I always pack the jib with a ten foot zoom cable
extension. This way, I can hold the zoom control and operate the jib arm from
the back.
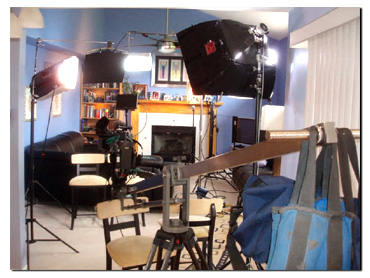
The other item you�ll absolutely need is a small monitor. Obviously, if you�re
running the jib arm from the back, you�re going to be about six or eight feet
away from the viewfinder, and unless you�re clairvoyant, you�ll have a difficult
time creating usable video. I haven�t found any tried and true ways to mount
a 4 to 5 inch monitor to the back of the jib arm, so I�ll often just have somebody
hold it for me. Simple. And, remember to bring a long piece of BNC cable in
order to connect the camera to the monitor. Finally, remember to bring shot
bags. Whatever type of camera you�re mounting, you�ll need to counterbalance
it on the other end.
The other alternative is to operate the jib from the camera end of the rig.
You can wrap your hands around your camera, and provide yourself the ability
to manually pan and tilt. And you get the added benefit of being able to look
directly into the viewfinder. Now you may need to be a bit of a contortionist
when you perform these maneuvers, and it does limit the range of your move,
but it gives you a lot of control. Oh well, there�s always trade-offs. I�ve
even used a step ladder to execute a move that starts fairly low and ends with
a high move. If the shot is worth it to you, then do whatever you need to safely
accomplish it.
Finally, when selecting a jib arm, remember that they come in many different
flavors. They differ in the type of material used to make the arm, the degree
of difficulty to set up, the length of the arm when fully extended, and other
options, I once owned a popular jib arm which had an adjustment that allowed
the camera to maintain the horizon during a move. This is an invaluable feature,
but unfortunately it was offset by the complexity of the set up and the extra
time it required to assemble, especially when I entered the brain lock created
by the combination of stress and lack of time. Ultimately, I chose a jib arm
that had fewer capabilities, but which set up quickly and easily. Evaluate your
needs and constraints, and then choose accordingly.
Photo by Carl Filoreto.
This article may not be reprinted in print or internet publications
without express permission of StudentFilmmakers.com. Photos may not be copied
or reproduced.
Check out this article in the August 2008 print edition of StudentFilmmakers magazine, page 10. Click here to get a copy of the August 2008 Edition, so you can read and enjoy all of the excellent articles inside.
About the Author:
 Carl
Filoreto is an award-winning DP, and his company is Elk Run Productions, Inc.
(www.elkruntv.com), which
has a roster of clients that spans corporations, production houses, crewing
agencies, and broadcast and cable networks, including Dateline NBC, The Food
Network, and The Travel Channel. Prior to starting his business, Carl won seven
regional Emmy awards, numerous national and regional National Press Photographers
awards, and multiple awards from Colorado Ski Country and the National Snowsports
Journalists Association, while working at KMGH-TV in Denver, WTNH in New Haven,
and WGGB in Springfield, Massachusetts.
Carl
Filoreto is an award-winning DP, and his company is Elk Run Productions, Inc.
(www.elkruntv.com), which
has a roster of clients that spans corporations, production houses, crewing
agencies, and broadcast and cable networks, including Dateline NBC, The Food
Network, and The Travel Channel. Prior to starting his business, Carl won seven
regional Emmy awards, numerous national and regional National Press Photographers
awards, and multiple awards from Colorado Ski Country and the National Snowsports
Journalists Association, while working at KMGH-TV in Denver, WTNH in New Haven,
and WGGB in Springfield, Massachusetts.
Resources:
About StudentFilmmakers Magazine & StudentFilmmakers.com >>
Join the Film and Digital Networking Community >>
Post Your Films, Videos, Reels, and Trailers >>
Discuss Motion Picture Techniques in the Online Industry Forums >>
Get the StudentFilmmakers.com E-Newsletter >>
StudentFilmmakers magazine would like to hear from you!
Click here to
share your comments and feedback about the magazine, monthly editions, your
favorite articles, and your favorite topics.
We always welcome and appreciate your Reader Comments. View them here, and send yours to the editorial team today!